Bridging SwiftUI into UIKit: interoperability done right!
Context
When dealing with large iOS apps, we do not always have the luxury of developing using the latest state-of-the-art tech, as every marginal percentage of user adoption can be critical. This is exactly what has been happening at Mercado Libre, the largest e-commerce marketplace in Latin America, where we were stuck on iOS 13 for the majority of 2023. Given our app's scale, SwiftUI was too immature for us to use effectively under that target. Sad. Fortunately, things have started to change and we managed to trade-off a target bump to iOS 15, where SwiftUI received major spec bumps and started to become production-safe!
Now what?
Major refactors were out of the question, as it would not really be cost-effective: a huge effort with marginal user gains, at least in the short term. Luckily, that was not even our intention! IMHO, the best way to start using SwiftUI is to progressively adopt it by bridging it into working UIKit.
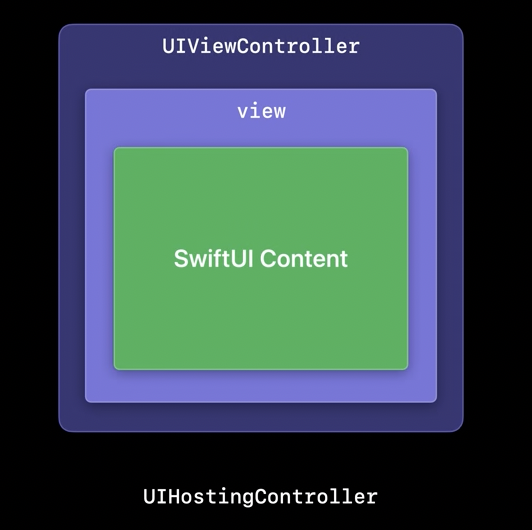
Hands on: Meet UIHostingController
UIHostingController as you can kind of guess by its name, will work as the host of our SwiftUI view. It is essentially a container of the view wrapped in a well-known UIViewController. The hierarchy looks like this:
Initializing one is as easy as:
// (1) Create your SwiftUI view:
let mySwiftUIView = MySwiftUIView()

// (2) Wrap it in a UIHostingController:
let hostingController = UIHostingController(rootView: mySwiftUIView)
The magic of this is that, as UIHostingController inherits from UIViewController, we can use any UIViewController API, and we can respond to any of the view-related events and lifecycle we are used in UIKit. Yay!
For example, we can now choose to present the hostingController modally from within the boundaries of an UIKit viewController (e.g., when tapping a button):
// (1) Modally presenting our hostingController:
self.present(hostingController, animated: true)
Or add it as a child viewController of the main viewController:
// (2) Adding our hostingController to a ParentViewController:
final class ParentViewController: UIViewController {

    override func viewDidLoad() {
        super.viewDidLoad()

        // Add our host as a child viewController:
        self.addChild(hostingController)
        self.view.addSubview(hostingController.view)
        hostingController.didMove(toParent: self)

        // Set its constraints programatically if needed:
        NSLayoutConstraint.activate([
            hostingController.view.topAnchor.constraint(equalTo: view.topAnchor),
            (...)
        ])
    }
(...)
}
Now we have complete interoperability between views! You can use your hostingController anywhere that you can use a viewController in UIKit.
Bonus: Sizing options for hosting Controllers
This is only available from iOS 16.
Additionally, you can also declare sizingOptions for your UIHostingController in order to use either:
- -
preferredContentSize: commonly used for popover presentations, as it informs the presenting view controller (the parent UIViewController) about the desired size of the presented view controller (the UIHostingController). - -
intrinsicContentSize: allows the hostingController's view to specify its ideal size based on its content.
And what about data?
Sharing data and state between both worlds sounds tricky, but in reality it can be pretty straightforward.
Bridging data from UIKit to SwiftUI can be as simple as:
- 1. Saving a reference of our
hostingController. - 2. Observing changes in the data.
- 3. Re-assigning a new
rootViewto ourhostingControllerwith an instance of our SwiftUI view with the new data.
Following the previous example:
final class ParentViewController: UIViewController {
    // (1) Save a reference of our hostingController and its associated SwiftUI view.
    let hostingController: UIHostingController<MySwiftUIView>

    // (2) Observe changes in the data we want to share, and call updateRootView() on changes in it:
    var sharedData: ParentSharedData {
        didSet { updateRootView() }
    }

    // (3) Assign a new rootView with the updated sharedData:
    func updateRootView() {
        hostingController.rootView = MySwiftUIView(data: sharedData)
    }
    (...)
}
As re-rendering SwiftUI views is relatively inexpensive, this method can be perfectly valid for cases where we do not have to save state in the wrapped SwiftUI view (as the new instances destroy previous state). But we can do better.
Leveraging observability in UIKit
To automatically update our SwiftUI view to changes in sharedData, we can instead leverage the @ObservedObject property wrapper. If you're already familiar with SwiftUI's state management, this should be straightforward. If not, don't worry; it's still super easy to grasp.
To achieve this, we need to:
- 1. Make
sharedDataconform to theObservableObjectprotocol. - 2. Add the
@Publishedproperty wrapper to the property we want to subscribe and re-draw on change. - 3. Store
sharedDataas an@ObservedObjectproperty in our SwiftUI view.
// (1) Add ObservableObject conformance:
class ParentSharedData: ObservableObject {

    // (2) Add @Published to broadcast changes in sharedProperty and initialize it:
    @Published var sharedProperty: String = ""
}
To conform to the
ObservableObjectprotocol our object needs to be ofclasstype, and our@Publishedproperties need to be mutable.
struct MySwiftUIView: View {

    // (3) Add the shared data as an @ObservedObject:
    @ObservedObject var data: ParentSharedData

    var body: some View {
        Text(data.sharedProperty)
    }
}
And we are done! Now, when sharedProperty changes, it publishes its changes, and our SwiftUI view subscribes to it, making it re-render on change.
I hope you found this article helpful. For any questions, comments, or feedback, don't hesitate to reach out: connect with me any of the social links below, or drop me an e-mail at marcos@varanios.com.
Thank you for reading! 🥰